In this two hour workshop, you will make and decorate a lotion bottle made of stoneware clay. The first hour will be focused on making the actual bottle and decorating it with applique. The second hour will be spent glazing it. You can make a bottle similar to the one pictured, or come up with your very own design – maybe sea oriented, or even sports related. The bottle will then be left to dry for a week before being fired in a kiln. The actual bottle, with lotion pump, will be available for pick up with in 3 weeks.
This workshop will take place Tuesday, February 12, from 6 – 8 pm. If you can’t make this date and would like to schedule another time, use the contact us tab and let me know what date and time would work for you (min 4 people).
One of the best aspects of my retirement, has been sharing my love of pottery with others. The last year, I have been offering pottery lessons as well as single night ceramic workshops at my home studio. With the new year, maybe you would like to add some relaxing creativity to your schedule, and here are a couple of ideas to do that.
Prescott Community Center Pieces
One of the workshops has been through the Prescott Community Center. This workshop is a 6 week project oriented class. Each week, students work on a new project. They have made mugs, bowls, plates, and butter dishes. All of which have been beautiful and unique. The great thing about pottery, in particular hand building, is you can make a professional looking piece, with no
experience. This spring, I will be offering two more workshops through Prescott. Once Prescott has the new catalog up, I will add a link.
High School freshman mug
On my website,I am offering an 8 week, 16 hours , pottery lessons. Currently, two of my students have both challenged me in very different ways. I have one young woman who is a freshman in high school. She is an artist, and combining that with her pottery, she has produced some really wonderful pieces. She has challenged me to be more artistic in my own glazing, and take more time in the final process. I love throwing, but glazing, which can be the make or break it of pottery making, has always been the worst part. I can make a beautiful pot, only to ruin it with my glazing.
Left Handed Bowl
My other challenger is a gentleman, who is left handed. I have been teaching pottery, off and on, since college, some 30 years now. I have never had a left handed person – or if I did, I didn’t know. Only recently have pottery wheels been able to go both directions – clock wise and counter clock wise. You could buy Shimpos way back then, which went both directions, but they were very expensive. As I am learning, people who are left handed are better suited to work on a wheel that turns clockwise, rather than counter clock wise – which most of us right handed folks use. I have to think twice when trying to help, and even with that,
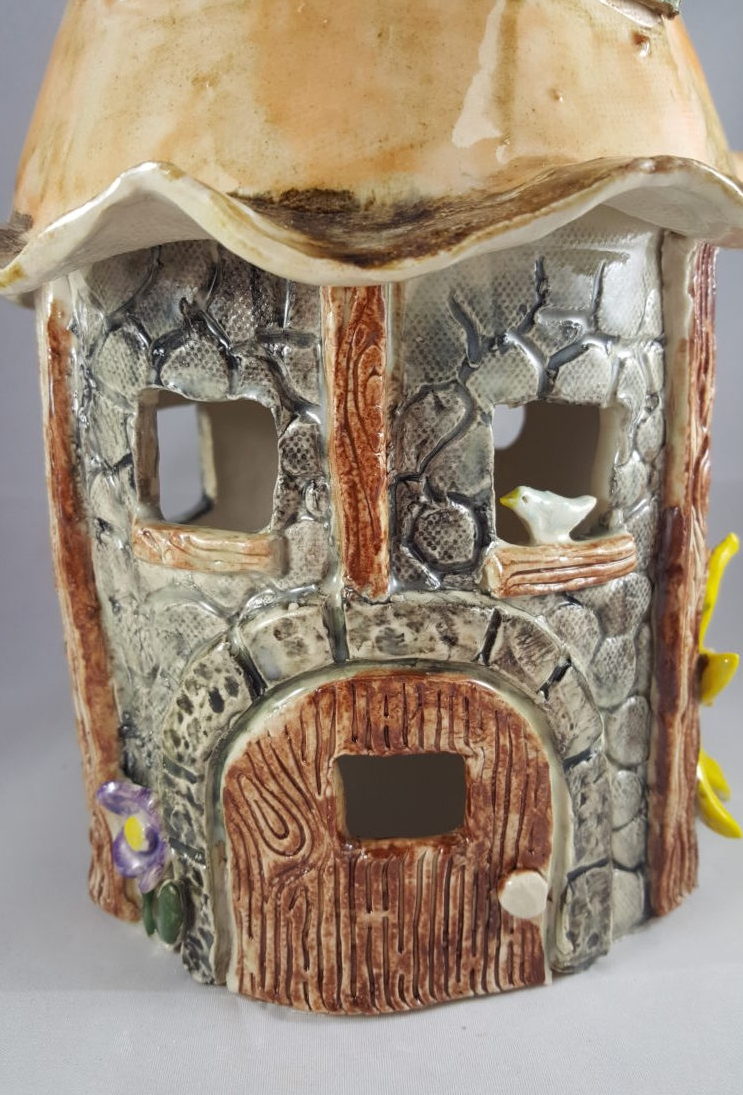
Fairy House made at Workshop
some times I still don’t get it right!For me, throwing, at this point, is pretty much second nature. I don’t really think about what I am doing, I just do it. Despite the challenge, and my help, he has made some really gorgeous pots.
Another workshop which has been popular is “Make a Fairy House” or ” Make a Toad House“. If your neighborhood toads and fairies are homeless, this is the workshop for you!
Zentangle Platter
Another recent workshop was with Donna Spencer, a certified Zentangle teacher, a woman I met through the gallery I used to manage. She was one of the participating artists who made some of the most beautiful intricate pen and ink designs, called Zentangle. We ran a workshop combining zentangle and clay, and the attendees, limited to just 4 folks, made some gorgeous platters.
Donna and I are offering a new workshop in March, which will combine Zentangle and Sgraffito. Sgraffito is an ancient technique used to decorate pottery where a design is scratched into the clay. The workshop is limited to four folks. During the workshop you will make the platter, learn about Zentangle, and create your own beautiful design on the platter. Instead of applying the glaze, as in the previous workshop, you will scratch away the glaze to create the design.
Oak Leaves – Zentangle and Sgraffito
Lastly, I will be offering a workshop Sunday 2/24/19. The workshop will make a lotion or soap dispenser. For more information about that workshop, click here.New Workshop – Make a Lotion Dispenser
I hope to see you soon at one of my workshops, so I can share with you my love of clay. Not only is it a creative venue, but you will also find it is very relaxing and good for the soul.
The other day I found myself making some piggy banks, and it got me to thinking…who ever thought of the idea of a piggy bank? Thank goodness, for the internet, with answers to questions at our finger tips.
From The FinancialBrand.com
“The origin of piggy banks dates back nearly 600 years, in a time before real banks even existed. Before the creation of modern-style banking institutions, people commonly stored their money at home — not under the mattress (or hay rack), but in common kitchen jars. During The Middle Ages, metal was expensive and seldom used for household wares. Instead, dishes and pots were made of an economical orange-colored clay called pygg. Whenever folks could save an extra coin or two, they dropped it into one of their clay jars — a pygg pot.” (https://thefinancialbrand.com/24204/history-of-piggy-banks/)
The piggy banks I made, started with 24 ounces of clay. From the original size, clay shrinks a lot more than you would expect – about 20% from start to finish. The original bodies of the pigs were about 8 inches long – the final bodies were about 6 inches long! After they are slowly dried for a day or two, legs, ears and eyes are added, giving them each their individual character. A slot is added on their back for money to be deposited, and a hole cut in their belly for withdrawals.
Pigs before the bisque firing
After a week of further drying, they are put in the kiln and cooked to 1900 degrees fahrenheit. This is called a bisque fire, and prepares them for the final glaze firing. I wanted to glaze them in a pale pink glaze recipe I found on the internet, but being an impatient kind of person, rather than testing the glaze first, I decided to plunge ahead and cross my fingers that the glaze would be the right color. While it is not pink, not close to what I expected, the gray color works, so my gamble worked out ok. I think I need to add more chrome, so I will do some more testing before I use it again. To glaze the pig, he is dunked in a bucket of glaze, which is basically powdered glass, and then I paint a flower on his rump using underglazes. The final glaze firing cooks the pigs to 2200 or so degrees fahrenheit.
Piggy banks are just one of the many functional, practical things that can be made with clay. Not only is it fun to work with clay have you checked out all the different workshops I offer?) Click here to learn more. Hand made ceramic pottery also makes a great gift, either for yourself, or maybe someone you know.
Do you find money in your washing machine? Used to happen to me, because I rarely used to check pockets when I do laundry. Always assumed people would put their dirty clothes in the hamper after they emptied their pockets. I used to keep a jar in the laundry room, into which all things collected from the washer would go. I wish I had one of these cute little piggy banks to store on the bathroom counter instead.
Maybe you have a young child learning about money? This is a way to help them understand the value of saving. The corked hole on the belly of the pig allows easy withdrawal, with out the trauma of having to smash the pig to get at the contents.
Piggy banks are fun to make because they do not require trimming. While they are more labor intensive to make, it is fun to see a row of them, with their expressive faces smiling back.
Join certified Zentangle teacher, Donna Spencer, and potter, Virginia Wood, as we lead you through the steps to make a functional stoneware tray on which you will carve beautiful sgraffito designs inspired by the mindful art of Zentangle.
The workshop starts with you making a clay platter. You will then spend an hour learning from Donna about the mindful art of Zentangle. You will take what you learned from Donna, and apply it to your platter. Your design will be completely your own on a ceramic platter you make from scratch. A wholly satisfying creative endeavor!
No experience needed! Click here to reserve your spot – limited to just 4 students. Once you make your platter, it will take time to dry before it is fired in the kiln. The platters are available for pick up 2 – 3 weeks following the date you make them.
A couple of platters, similar to what will be made during the workshop, that were made using the sgraffito technique. Your design, though, will be your own!
Not available March 3, but you would still like to make the platters, gather three other friends, and Donna and I will work with you to find a date that works.
Doesn’t every fairy deserve a roof over their head? Now you can provide a safe and beautiful home for your fairies.
You will make a ceramic home using slabs of clay and different textures to create that one of a kind home. You will be led through basic construction, and helped to design any embellishments you want to add, within the time allowed. The basic construction is a stone, cobblestone, or brick textured house, with a flower (datura type) roof. It takes a full 3 hours to make one of these houses – the first hour is spent building the house and roof, the second hour is adding any embellishments – mushrooms, butterflies, bugs, flowers, door, windowboxes…etc.), and the final hour is painting or glazing the the house.
After you make your house and it has dried, I fire it in a kiln to 1900 degrees fahrenheit. I then add a clear satin glaze over the outside of your house, and refire to 2200 degrees fahrenheit. Your finished house will be available for pick up within 2 weeks.
This workshop is limited to 4 people. If you would like to schedule a private workshop for just you and your friends and family, that is easily accomplished. Just use the “Contact” tab on the main menu.
Theoretically, these houses can be left out all winter, but it is not advisable.
Using white stoneware and leaves from the yard, you will will make 15 leaf ornaments all about 2.5 inches square. These ornaments can be used for holiday decoration, or string them together to make a wind chime.
This is a two day workshop. The first day (DECEMBER 2, 1 – 3 PM) will be spent making the ornaments, the second day (DECEMBER 9, 1 – 3 PM) will be spent cleaning them up and glazing. You will be able to pick up the ornaments (wind chimes) within the following week.
Glazes available include: black, green, brown, silver, copper colored, and sparkled brown.
The leaves can also be glazed using under glazes, and then a clear coat. The colors of under glazes available include: black, white, red, yellow, green, brown, and various shades of pinks, purples, and blues.
ALL AGES WELCOME, young children must be accompanied by an adult.
 https://www.startonthestreet.org/


 The other day I found myself making some piggy banks, and it got me to thinking…who ever thought of the idea of a piggy bank? Thank goodness, for the internet, with answers to questions at our finger tips.
 The piggy banks I made, started with 24 ounces of clay. From the original size, clay shrinks a lot more than you would expect – about 20% from start to finish. The original bodies of the pigs were about 8 inches long – the final bodies were about 6 inches long! After they are slowly dried for a day or two, legs, ears and eyes are added, giving them each their individual character. A slot is added on their back for money to be deposited, and a hole cut in their belly for withdrawals.


 Doesn’t every fairy deserve a roof over their head? Now you can provide a safe and beautiful home for your fairies.


 Using white stoneware and leaves from the yard, you will will make 15 leaf ornaments all about 2.5 inches square. These ornaments can be used for holiday decoration, or string them together to make a wind chime.


